A Lunchbox Dew Heater
One of the biggest concerns with winter observing and imaging is the onset of dew but there are several solutions to this problem. Blowing warm, dry air over the optics or using extendable dew-shields are some methods, but probably the most popular and convenient method is an electric dew heater.
These have been commercially available from various manufacturers since the 1980’s however can end up costing several hundred dollars for a basic setup comprising of a control box and a pair of heater-bands. There are a couple of less expensive alternatives to the commercial option which I will cover here.
The Dew Strap
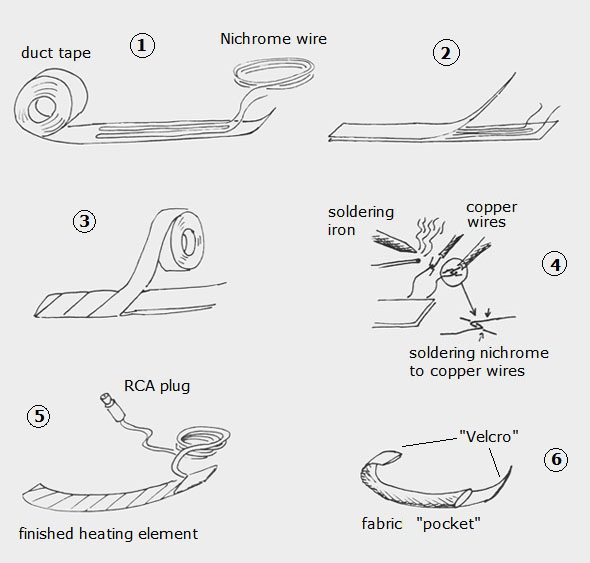
Generally the dew strap is constructed from an electrically resistive circuit which generates heat as an electric current is passed through the circuit. Although everyone will have different requirements, I have found that a 4W heater was more than adequate to keep my 71mm camera lens and a 12W heater for my 90mm guide scope free of dew on the worst of evenings.
The two most popular methods of DIY dew strap construction seem to be either a parallel array of electronic resistors (see http://www.iceinspace.com.au/63-292-0-0-1-0.html) or with a continuous circuit of NiChrome resistance wire sandwiched between an insulating material, usually duct tape (see http://www.deepskywatch.com/images/articles/dew-control/instructions-nichrome-heater.jpg).
Having had success with both of these methods in the past I recently discovered an affordable alternative on an internet auction site.
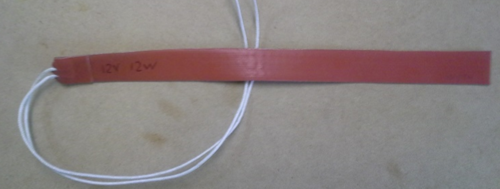
These are a prefabricated silicone rubber strap heater band which can be found in a large range of sizes and wattage. Although most of these heater strips are rated for 12Vdc there is also a range rated at 24Vdc which can still be run at 12Vdc but as the Voltage is proportional to the square root of the Power, halving the Voltage will quarter the Power. This means a 24Vdc 40W heater will only yield 10W at 12Vdc.
The Dew Heater Controller
In most instances dew heaters won’t need to be run at full capacity, so some form of controller is useful. As the dew heater band has a fixed resistance this can be done by varying the amount of continuous current that flows through the circuit.
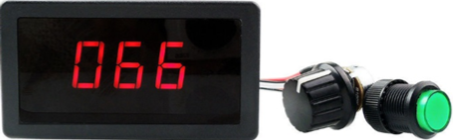
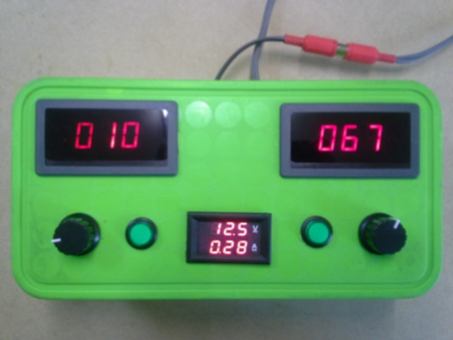
These days one of the simplest solutions for this is with Pulse Width Modulation (PWM). Fortunately, most DC motor controllers use PWM to vary the motor’s speed and there seem to be no shortage of these on the Internet auction sites. The units that I found for just under $10 each came equipped with a 3 digit red LED numeric display, an on/off push button switch and could handle a maximum of 60W. The LED display indicates the percentage of power delivery to the dew heater, so with a 12V 10W heater a setting of 40 would run the heater at about 4W.
One optional item in the assembly will help monitor the battery voltage and current being drawn. Purchased online for under $5, with a dual red LED display, this volt/amp meter is a worthwhile addition for keeping track of the battery’s state of charge. To keep the package light I chose to use a RC Model 5Ahr LiPo battery which has proved to have enough capacity for several nights dew-free imaging.
The wiring is fairly straight forward for anyone with a little electrical experience and at minimum a 5A inline fuse to the battery is strongly recommended. As everyone will have their own individual requirements, if you need any further information or assistance in this project please feel free to contact me through the ASSA-Chat Forum.
Thanks to my son Andrew for the skill with his Dremel and thanks to my son Bennett for his old lunchbox.